Benchmark Open Commerce Search Stack
with Rally
In my last article, we learned how to create and run a Rally-Track. In this article, we’ll take a deeper and look at a real-world Rally example. I’ve chosen to use OCSS, where we can easily have more than 50.000 documents in our index and about 100.000 operations per day. So let’s begin by identifying which challenges make sense for our sample project.
Identify what you want to test for your benchmarking
Before benchmarking, it must be clear what we want to test. This is needed to prepare the Rally tracks and determine which data to use for the benchmark. In our case, we want to benchmark the user’s perspective on our stack. The open-commerce search stack, or OCSS, uses ElasticSearch for a commerce search engine. In this context, a user has two main tasks within ElasticSearch:
- searching
- indexing
We can now divide these two operations into three cases. Below, you will find them listed in order of importance for the project at hand:
- searching
- searching while indexing
- indexing
Searching
In the context of OCSS, search performance has a direct impact on usability. As a result, search performance is the benchmark we focus on most in our stack. Furthermore, [OCSS] does more than transforming the user query into a simple ElasticSearch query. OCSS goes a step further and uses a single search query to generate one or more complex ElasticSearch queries (take a look here for more detailed explanation). For this reason, our test must account for this as well.
Searching while Indexing
Sometimes it’s necessary to simultaneously search and index your complete product data. The current [OCSS] search index is independent of the product data. This architecture was born out of Elasticsearch’s lack of native standard tools (not requiring hackarounds over snapshots) to clearly and permanently define nodes for indexing and nodes for searching. As a result, the indexing load influences the whole cluster performance. This must be benchmarked.
Indexing
The impact of indexing time to the user within OCSS is marginal. However, in the interest of a comprehensive understanding of the data, we will also test indexing times independently. And rounding off our index tests: we want to determine how long a complete product index could possibly take to run.
What data should be used for testing and how to get it
For our benchmark, we will need two sets of data. The index data itself, with the index settings and the search queries from OCSS to ElasticSearch. The index data and settings within Elasticsearch are easily extracted using the Rally create-track command. Enabling the spring-profile: trace-searches allows us to retrieve the Elasticsearch queries generated by the OCSS based on the user query. Then configure the logback function in OCSS so that each search records to the searches.log. This log contains both the raw user query and the generated Elasticsearch query from OCSS.

How to create a track under normal circumstances
After we have the data and basic track (generated by the create-track command) without challenges, it’s time to execute our challenges from above. However, because Rally has no operation to iterate and subsequently render every file line as a search, we would have to create a custom runner to provide this operation.
Do it the OCSS way
We will not do this by hand in our sample but rather enable the trace-searches profile and use the OCSS bash script to extract the index data and settings. This will generate a track based on the index and search data outlined in the cases above.
So once we have OCSS up and running and enough time has passed to gather a representative number of searches, we can use the script to create a track using production data. For more information, please take a look here. The picture below is a good representation of what we’re looking at:

Make sure you have all requirements installed before running the following commands.
First off: identify the data index within OCSS:
					(/tmp/blog)➜  test_track$ curl http://localhost:9200/_cat/indices
green open ocs-1-blog kjoOLxAmTuCQ93INorPfAA 1 1 52359 0 16.9mb 16.9mb
Once you have the index and the searches.log you can run the following script:
					(open-commerce-stack)➜  esrally$ ./create-es-rally-track.sh -i ocs-1-blog -f ./../../../search-service/searches.log -o /tmp -v -s 127.0.0.1:9200
Creating output dir /tmp ...
Output dir /tmp created.
Creating rally data from index ocs-1-blog ...

    ____        ____
   / __ \____ _/ / /_  __
  / /_/ / __ `/ / / / / /
 / _, _/ /_/ / / / /_/ /
/_/ |_|\__,_/_/_/\__, /
                /____/

[INFO] Connected to Elasticsearch cluster [ocs-es-default-1] version [7.5.2].

Extracting documents for index [ocs-1-blog]...       1001/1000 docs [100.1% done]
Extracting documents for index [ocs-1-blog]...       2255/2255 docs [100.0% done]

[INFO] Track ocss-track has been created. Run it with: esrally --track-path=/tracks/ocss-track

--------------------------------
[INFO] SUCCESS (took 25 seconds)
--------------------------------
Rally data from index ocs-1-blog in /tmp created.
Manipulate generated /tmp/ocss-track/track.json ...
Manipulated generated /tmp/ocss-track/track.json.
Start with generating challenges...
Challenges from search log created.
If the script is finished, the folder ocss-track is created in the output location /tmp/. Let’s get an overview using tree:
					(/tmp/blog)➜  test_track$ tree /tmp/ocss-track
/tmp/ocss-track
├── challenges
│   ├── index.json
│   ├── search.json
│   └── search-while-index.json
├── custom_runner
│   └── ocss_search_runner.py
├── ocs-1-blog-documents-1k.json
├── ocs-1-blog-documents-1k.json.bz2
├── ocs-1-blog-documents.json
├── ocs-1-blog-documents.json.bz2
├── ocs-1-blog.json
├── rally.ini
├── searches.json
├── track.json
└── track.py

2 directories, 13 files
OCSS output
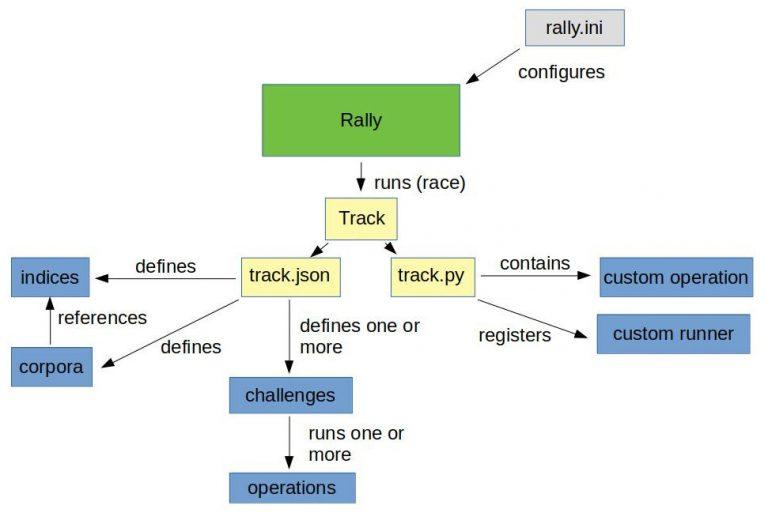
As you can see, we have 2 folders and 13 files. The challenges folder contains 3 files where each file contains one of our identified cases. The 3 files in the challenges folder are loaded in track.json.
OCSS Outputs JSON Tracks
The custom_runner folder contains the ocss_search_runner.py. This is where our custom operation is stored. It controls the iterations across searches.json. This same operation fires each Elasticseach query to be benchmarked against Elasticsearch. The custom runner must be registered in track.py. The ocs-1-blog.json contains the index settings. The files ocs-1-blog-documents-1k.json and ocs-1-blog-documents.json include the index documents; and are available as .bz2 files. The last file we have is the rally.ini file; it contains all Rally settings and, in the event a more detailed export is required, beyond a simple summary like in the example below, this file specifies where the metrics should be outputted. The following section of rally.inidefines that the result data should be stored in Elasticsearch:
					[reporting]
datastore.type = elasticsearch
datastore.host = 127.0.0.1
datastore.port = 9400
datastore.secure = false
datastore.user =
datastore.password =
Overview of what we want to do:

Run the benchmark challenges
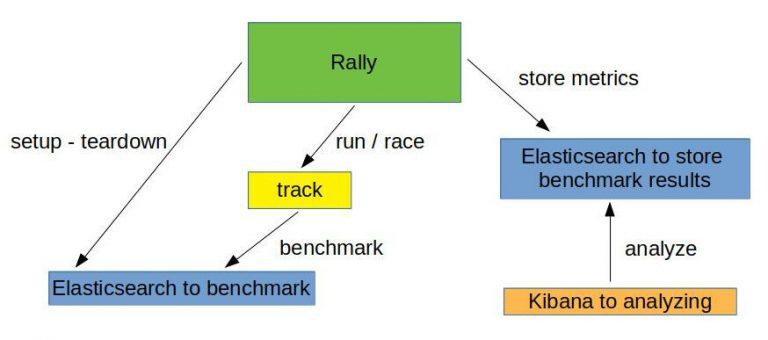
Now that the track is generated, it’s time to run the benchmark. But, first, we have to initiate Elasticsearch and Kibana for the benchmark results. This is what docker-compose-results.yaml is for. You can find here.
					(open-commerce-stack)➜  esrally$ docker-compose -f docker-compose-results.yaml up -d
Starting esrally_kibana_1 ... done
Starting elasticsearch    ... done
(open-commerce-stack)➜  esrally$ docker ps
CONTAINER ID        IMAGE                                                       COMMAND                  CREATED             STATUS              PORTS                              NAMES
b3ebb8154df5        docker.elastic.co/elasticsearch/elasticsearch:7.9.2-amd64   "/tini -- /usr/local…"   15 seconds ago      Up 3 seconds        9300/tcp, 0.0.0.0:9400->9200/tcp   elasticsearch
fc454089e792        docker.elastic.co/kibana/kibana:7.9.2                       "/usr/local/bin/dumb…"   15 seconds ago      Up 2 seconds        0.0.0.0:5601->5601/tcp             esrally_kibana_1
Benchmark Challenge #1
Once the Elasticsearch/Kibana stack is ready for the results, we can begin with our first benchmark challenge by sending indexthe following command:
					docker run -v "/tmp/ocss-track:/rally/track" -v "/tmp/ocss-track/rally.ini:/rally/.rally/rally.ini" --network host \
    elastic/rally race --distribution-version=7.9.2 --track-path=/rally/track --challenge=index --pipeline=benchmark-only --race-id=index
Now would be a good time to have a look at the different parameters available to start Rally:
- –distribution-version=7.9.2 -> The version of Elasticsearch Rally should use for benchmarking
- –track-path=/rally/track -> The path where we mounted our track into the rally docker-container
- –challenge=index -> The name of the challenge we want to perform
- –pipeline=benchmark-only the pipeline rally should perform
- –race-id=index -> The race-id which to use instead of a generated id (helpful for analyzing)
Benchmark Challenge #2
Following the index challenge we will continue with the search-while-index challenge:
					docker run -v "/tmp/ocss-track:/rally/track" -v "/tmp/ocss-track/rally.ini:/rally/.rally/rally.ini" --network host \
    elastic/rally race --distribution-version=7.9.2 --track-path=/rally/track --challenge=search-while-index --pipeline=benchmark-only --race-id=search-while-index
Benchmark Challenge #3
Last but not least the search challenge:
					docker run -v "/tmp/ocss-track:/rally/track" -v "/tmp/ocss-track/rally.ini:/rally/.rally/rally.ini" --network host \
    elastic/rally race --distribution-version=7.9.2 --track-path=/rally/track --challenge=search --pipeline=benchmark-only --race-id=search
Review the benchmark results
Let’s have a look at the benchmark results in Kibana. A few special dashboards exist for our use cases, but you’ll have to import them into Kibana. For example, have a look at either this one or this one here. Or, you can create your own visualization as I did:
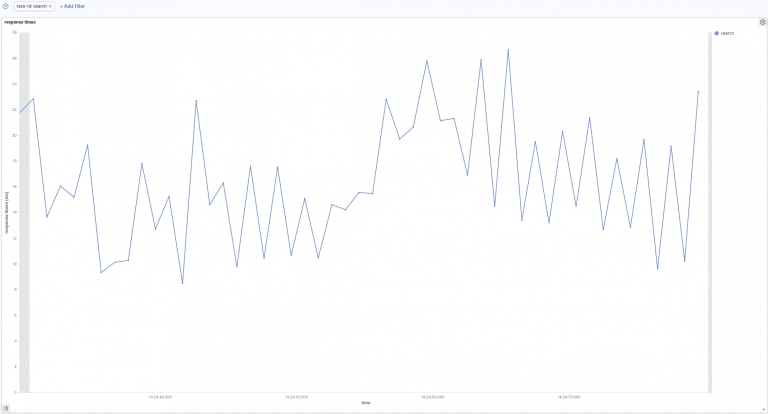
Search:

In the above picture, we can see the search response times over time. Our searches take between 8ms and 27ms to be processed. Next, let’s go to the following picture. Here we see how search times are influenced by indexation.
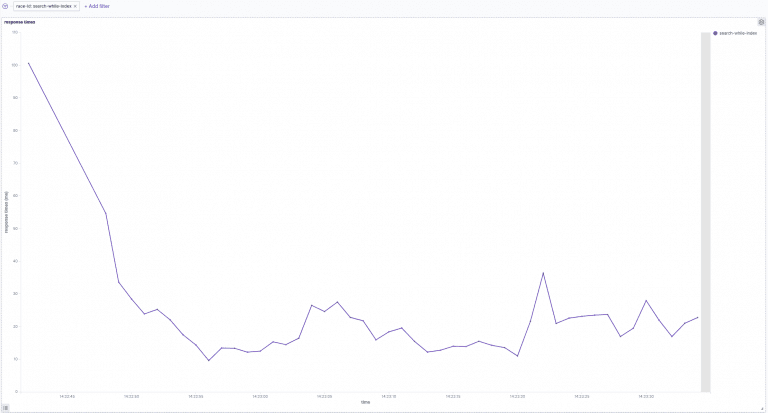
Search-while-index:

The above image shows search response times over time while indexing. In the beginning, indexing while simultaneously searching increases the response time to 100ms. This later decreases to 10ms and 40ms.
Summary
This post gave you a more complete understanding of how benchmarking your site-search within Rally looks. Additionally, you learned about the unique OCSS application to trigger tracks within Rally. Not only that, you now have a better practical understanding of Rally benchmarking, which will help you create your own system even without OCSS.
Thanks for reading!


